TryCatch Blog


  • 首页

  • 归档

  • 分类

  • 标签

  • 搜索
close
TryCatch Blog

hexo hexo-theme-next 搭建blog系统

发表于 2017-05-16 | 分类于 blog | | 阅读次数
下载安装hexo
1
$ npm install -g hexo-cli

安装好hexo以后,在终端输入:

1
$ hexo

得到如下信息

1
2
3
4
5
6
7
8
9
➜ guoyoujin.github.io git:(develop) ✗ hexo
Usage: hexo <command>
Commands:
clean Removed generated files and cache.
config Get or set configurations.
deploy Deploy your website.
generate Generate static files.
----------------------部分省略
or you can check the docs: http://hexo.io/docs/

初始化博客
1
2
3
4
5
6
// 建立一个博客文件夹,并初始化博客,guoyoujin.github.io为文件夹的名称,可以随便起名字
$ hexo init guoyoujin.github.io
// 进入博客文件夹,guoyoujin.github.io为文件夹的名称
$ cd guoyoujin.github.io
// node.js的命令,根据博客既定的dependencies配置安装所有的依赖包
$ npm install
hexo next them 使用手册

http://theme-next.iissnan.com/getting-started.html

安装next主题
1
$ git clone https://github.com/iissnan/hexo-theme-next themes/next
启用主题

与所有 Hexo 主题启用的模式一样。 当 克隆/下载 完成后,打开 站点配置文件, 找到 theme 字段,并将其值更改为 next。

1
2
启用 NexT 主题
theme: next

到此,NexT 主题安装完成。下一步我们将验证主题是否正确启用。在切换主题之后、验证之前, 我们最好使用 hexo clean 来清除 Hexo 的缓存。

验证主题

首先启动 Hexo 本地站点,并开启调试模式(即加上 –debug),整个命令是 hexo s –debug。

1
$ hexo s --debug

在服务启动的过程,注意观察命令行输出是否有任何异常信息,如果你碰到问题,这些信息将帮助他人更好的定位错误。 当命令行输出中提示出:

1
INFO Hexo is running at http://0.0.0.0:4000/. Press Ctrl+C to stop.

此时即可使用浏览器访问 http://localhost:4000,检查站点是否正确运。不出所料应该已经能看到样式了

主题设定

选择 Scheme

Scheme 是 NexT 提供的一种特性,借助于 Scheme,NexT 为你提供多种不同的外观。同时,几乎所有的配置都可以 在 Scheme 之间共用。目前 NexT 支持三种 Scheme,他们是:

Muse - 默认 Scheme,这是 NexT 最初的版本,黑白主调,大量留白
Mist - Muse 的紧凑版本,整洁有序的单栏外观
Pisces - 双栏 Scheme,小家碧玉似的清新
Scheme 的切换通过更改 主题配置文件,搜索 scheme 关键字。 你会看到有三行 scheme 的配置,将你需用启用的 scheme 前面注释 # 去除即可。

选择 Pisces Scheme

1
2
3
#scheme: Muse
#scheme: Mist
scheme: Pisces

设置语言

编辑 站点配置文件, 将 language 设置成你所需要的语言。建议明确设置你所需要的语言,例如选用简体中文,配置如下:

1
language: zh-Hans

hexo-admin配置

https://github.com/jaredly/hexo-admin

1
2
3
npm install --save hexo-admin
hexo server -d
open http://localhost:4000/admin/

密码设置,需要在根母目录下的/_config.yml文件里面加入如下代码

1
2
3
4
admin:
username: guoyoujin
password_hash: $2a$10$8f0CO288aEgpb0BQk0mAEOIDwPS.s6nl703xL6PLTVzM.758x8xsi
secret: a secret something

注意上面的password_hash需要使用nodejs语语法生成

1
2
3
4
5
$ npm install bcrypt-nodejs --save
$ node
> const bcrypt = require('bcrypt-nodejs')
> bcrypt.hashSync('your password secret here!')
//=> '$2a$10$8f0CO288aEgpb0BQk0mAEOIDwPS.s6nl703xL6PLTVzM.758x8xsi'

把上面输出的值替换成password_hash的值即可

发布

运行一下命令将Hexo上传到Github

1
2
$ hexo generate
$ hexo deploy
开启baidu站点收录

链接地址: http://zhanzhang.baidu.com/site

添加站点: guoyoujin.github.io

进行验证:
png

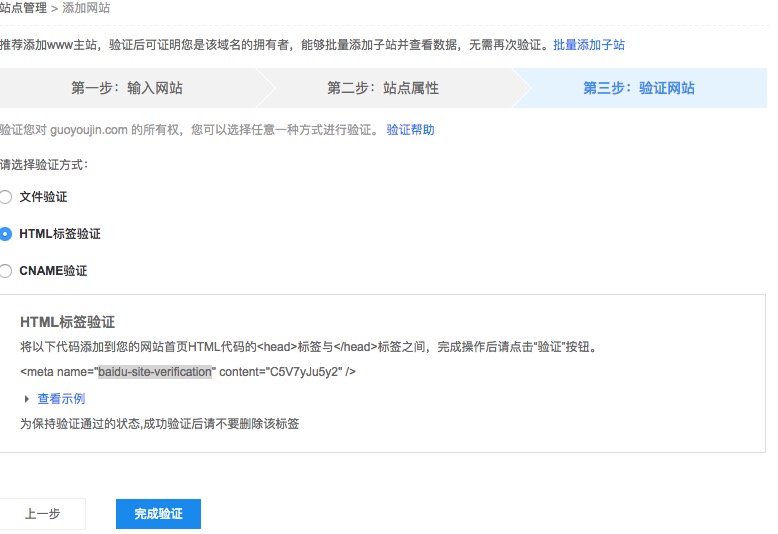
注意上面的content的值有用,需要写入/them/next/_config.yml里面,如下:

1
baidu_site_verification: C5V7yJu5y2

完成以上步骤之后,部署一下,点击完成验证,即可验证成功

Hexo插件之百度主动提交链接

百度地址: https://tongji.baidu.com

前提
您得注册百度站长工具,然后在工具->网页抓取->链接提交里找到你的密匙。
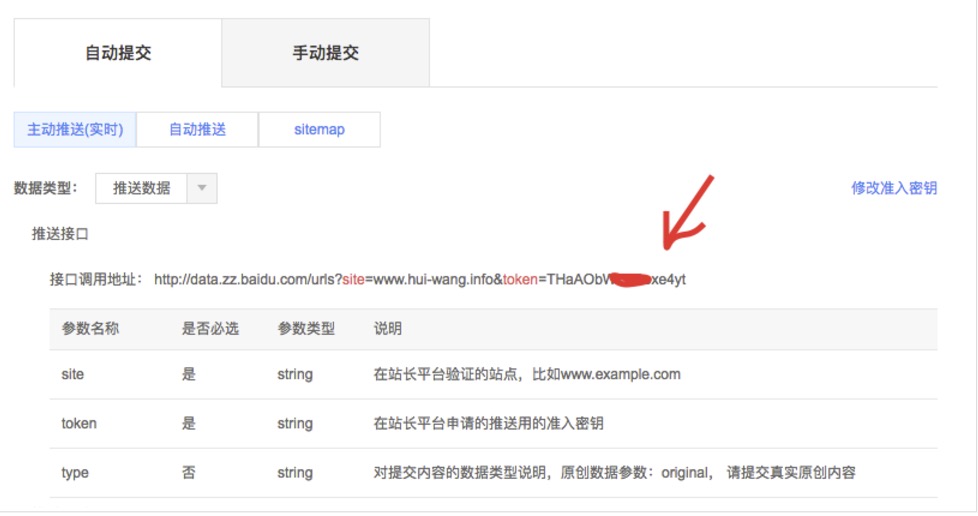
png
首先,在Hexo根目录下,安装本插件:

1
npm install hexo-baidu-url-submit --save

在 them/next/_config.yml文件里面,填写以下数据

1
2
3
4
5
baidu_url_submit:
count: 1 ## 提交最新的一个链接
host: guoyoujin.github.io ## 在百度站长平台中注册的域名
token: uSnj5Dx11111111 ## 请注意这是您的秘钥, 所以请不要把博客源代码发布在公众仓库里!
path: baidu_urls.txt ## 文本文档的地址, 新链接会保存在此文本文档里

百度统计 http://tongji.baidu.com/sc-web

在 them/next/_config.yml文件里面,填写以下数据

1
2
# Baidu Analytics ID
baidu_analytics: 658ef8640c9dcf118730ad9d90

leancloud阅读统计 https://leancloud.cn

教程地址: https://notes.wanghao.work/2015-10-21-%E4%B8%BANexT%E4%B8%BB%E9%A2%98%E6%B7%BB%E5%8A%A0%E6%96%87%E7%AB%A0%E9%98%85%E8%AF%BB%E9%87%8F%E7%BB%9F%E8%AE%A1%E5%8A%9F%E8%83%BD.html#%E9%85%8D%E7%BD%AELeanCloud

TryCatch Blog

git命令大全

发表于 2017-05-16 | 分类于 git | | 阅读次数
1
2
3
4
5
6
7
8
9
10
11
12
13
14
15
16
17
18
19
20
21
22
23
24
25
26
27
28
29
30
31
32
33
34
35
36
37
38
39
40
41
42
43
44
45
46
47
48
49
50
51
52
53
54
55
56
57
58
59
60
61
62
63
64
65
66
67
68
69
70
71
72
73
74
75
76
77
78
79
80
81
82
83
84
85
86
87
git init # 初始化本地git仓库(创建新仓库)
git config --global user.name "xxx" # 配置用户名
git config --global user.email "xxx@xxx.com" # 配置邮件
git config --global color.ui true # git status等命令自动着色
git config --global color.status auto
git config --global color.diff auto
git config --global color.branch auto
git config --global color.interactive auto
git config --global --unset http.proxy # remove proxy configuration on git
git clone git+ssh://git@192.168.53.168/VT.git # clone远程仓库
git status # 查看当前版本状态(是否修改)
git add xyz # 添加xyz文件至index
git add . # 增加当前子目录下所有更改过的文件至index
git commit -m 'xxx' # 提交
git commit --amend -m 'xxx' # 合并上一次提交(用于反复修改)
git commit -am 'xxx' # 将add和commit合为一步
git rm xxx # 删除index中的文件
git rm -r * # 递归删除
git log # 显示提交日志
git log -1 # 显示1行日志 -n为n行
git log -5
git log --stat # 显示提交日志及相关变动文件
git log -p -m
git show dfb02e6e4f2f7b573337763e5c0013802e392818 # 显示某个提交的详细内容
git show dfb02 # 可只用commitid的前几位
git show HEAD # 显示HEAD提交日志
git show HEAD^ # 显示HEAD的父(上一个版本)的提交日志 ^^为上两个版本 ^5为上5个版本
git tag # 显示已存在的tag
git tag -a v2.0 -m 'xxx' # 增加v2.0的tag
git show v2.0 # 显示v2.0的日志及详细内容
git log v2.0 # 显示v2.0的日志
git diff # 显示所有未添加至index的变更
git diff --cached # 显示所有已添加index但还未commit的变更
git diff HEAD^ # 比较与上一个版本的差异
git diff HEAD -- ./lib # 比较与HEAD版本lib目录的差异
git diff origin/master..master # 比较远程分支master上有本地分支master上没有的
git diff origin/master..master --stat # 只显示差异的文件,不显示具体内容
git remote add origin git+ssh://git@192.168.53.168/VT.git # 增加远程定义(用于push/pull/fetch)
git branch # 显示本地分支
git branch --contains 50089 # 显示包含提交50089的分支
git branch -a # 显示所有分支
git branch -r # 显示所有原创分支
git branch --merged # 显示所有已合并到当前分支的分支
git branch --no-merged # 显示所有未合并到当前分支的分支
git branch -m master master_copy # 本地分支改名
git checkout -b master_copy # 从当前分支创建新分支master_copy并检出
git checkout -b master master_copy # 上面的完整版
git checkout features/performance # 检出已存在的features/performance分支
git checkout --track hotfixes/BJVEP933 # 检出远程分支hotfixes/BJVEP933并创建本地跟踪分支
git checkout v2.0 # 检出版本v2.0
git checkout -b devel origin/develop # 从远程分支develop创建新本地分支devel并检出
git checkout -- README # 检出head版本的README文件(可用于修改错误回退)
git merge origin/master # 合并远程master分支至当前分支
git cherry-pick ff44785404a8e # 合并提交ff44785404a8e的修改
git push origin master # 将当前分支push到远程master分支
git push origin :hotfixes/BJVEP933 # 删除远程仓库的hotfixes/BJVEP933分支
git push --tags # 把所有tag推送到远程仓库
git fetch # 获取所有远程分支(不更新本地分支,另需merge)
git fetch --prune # 获取所有原创分支并清除服务器上已删掉的分支
git pull origin master # 获取远程分支master并merge到当前分支
git mv README README2 # 重命名文件README为README2
git reset --hard HEAD # 将当前版本重置为HEAD(通常用于merge失败回退)
git rebase
git branch -d hotfixes/BJVEP933 # 删除分支hotfixes/BJVEP933(本分支修改已合并到其他分支)
git branch -D hotfixes/BJVEP933 # 强制删除分支hotfixes/BJVEP933
git ls-files # 列出git index包含的文件
git show-branch # 图示当前分支历史
git show-branch --all # 图示所有分支历史
git whatchanged # 显示提交历史对应的文件修改
git revert dfb02e6e4f2f7b573337763e5c0013802e392818 # 撤销提交dfb02e6e4f2f7b573337763e5c0013802e392818
git ls-tree HEAD # 内部命令:显示某个git对象
git rev-parse v2.0 # 内部命令:显示某个ref对于的SHA1 HASH
git reflog # 显示所有提交,包括孤立节点
git show HEAD@{5}
git show master@{yesterday} # 显示master分支昨天的状态
git log --pretty=format:'%h %s' --graph # 图示提交日志
git show HEAD~3
git show -s --pretty=raw 2be7fcb476
git stash # 暂存当前修改,将所有至为HEAD状态
git stash list # 查看所有暂存
git stash show -p stash@{0} # 参考第一次暂存
git stash apply stash@{0} # 应用第一次暂存
git grep "delete from" # 文件中搜索文本“delete from”
git grep -e '#define' --and -e SORT_DIRENT
git gc
git fsck
git checkout -b test remotes/origin/test #本地切换到远程分支

【参考资料】

git

12
TryCatch

TryCatch

千里之行,始于足下

12 日志
6 分类
10 标签
GitHub Twitter 微博 豆瓣
© 2017 TryCatch
由 Hexo 强力驱动
主题 - NexT.Pisces